There are so much information about tufting on the internet, some are great, some are not so, some contradict each other. We’ve put together a compilation of information from all the helpful tufters on the internet, these guides/tips/tricks have been tested by us personally and they worked! Credits to all the original authors, go ahead and check out their work on their social media – link included!
Before starting a tufting project you need to ensure you have proper frame set up, the right fabric, a good yarn management system and most importantly, understand the basics of how to use a tufting gun. Let’s go through them one by one
Frame Set Up
Depending on the size of your project, you’ll need a frame with inner width at least 2 inches bigger than the size of your final artwork. This is because after completing your artwork, you will need the extra 2-inch fabric around the edges for finishing.
Lacuna Loops on Youtube has a great video on how to build a small tufting frame that comes with yarn guide. This is great for beginner or those who have limited space for tufting.
For bigger project or if you just simply prefer to have a bigger frame, No Fun has a great tutorial on how to make huge frame. They’re on Instagram too. Just bear in mind that you will have to fill up the frame before cutting off an artwork from the frame 🙂 Once you cut off a part of the fabric from the frame, the fabric will not be tight enough for tufting.
If you prefer a no-frills solution, our Easy Self-Assembly Tufting Frame is a great option to go for, all you need is just a screwdriver and a hammer to assemble. They come with options to add-on yarn winder and there are 2 sizes to choose from.
Fabric
The best fabric for tufting is primary tufting cloth, it holds all your yarn in place so it has to be strong. There are a few kinds of primary tufting cloth in the market.
Cotton/polyester blend fabric – This is overall great for any tufting project with tufting gun or manual tufting tool. The common types of fabric that you see on the market in beige base with yellow guide lines or white base with green guide lines, they are cotton/polyester blend.
100% polyester – This fabric is commonly used in Europe and is great for any tufting project with tufting gun or manual tufting tool. Because of its material, it is also great for outdoor rug making. Most grey fabric with white guide lines are 100% polyester, some plain white tufting fabric is also 100% polyester.
100% cotton – This kind of fabric is not the best, but OK for tufting, you will need to use the kind that are slightly loose in weave compared to monk’s cloth in order to not tear the fabric with tufting gun/manual tufting tool. 100% cotton fabric is better used for punch needle.
Burlap – This is not the best fabric for tufting but if you are unable to find proper primary tufting fabric in your area, you can try burlap 🙂
After identifying the right kind of fabric to use, you will need to ensure it is stretched drum-tight on your frame. Here’s an Instagram video from @kramis_teppich_design showing how to stretch primary tufting cloth onto a frame. This is by far the best video really showing how tight your fabric needs to be in order to create a great tug.
Yarn management is very personal and subjective. The bottom line to a good yarn feeding system is that – your yarn has to be free-flowing, no matter what kind of yarn you’re using. There should not be any tension or resistance, or it will contribute to your yarn getting pulled out from primary tufting fabric, or it could tear your fabric.
Some of you might already have access to cone yarn, tufting is super easy, just get 2 to 3 cones of yarns in the same color and thread all 3 strands to your tufting gun.
Cone yarn is hard to find in Asia, if you are currently using bullet skein, pull skein, or hank which are common in yarn shop, you might have to wind them into yarn cake using a yarn winder for ease of use. We have an electrical yarn winder which can do this in no time.
Here’s an image from Interweave.com showing different types of yarn put-ups just to give you an idea.
Image from Interweave.com
If you’re not ready to invest in an electrical yarn winder and you’d prefer not to use manual yarn winder (we all know how tedious it is to use a manual one), here’s a video from Cristina Perez Art showing how to use a drill to wind yarn into cone. Cristina is selling her tufted rug on Depop, do check out her work here.
Another good way of managing bullet skein or pull skein yarn for tufting is to pull both ends of a single ball and thread feed them into your tufting gun to tuft. This is a great way to use yarn from bullet skein or pull skein without having to wind them into a cone/cake. However, you’ll need to check on the skein every once in a while when you tuft to ensure they’re not tangled up.
Here’s a video from All Free Knitting showing how to find both yarn ends of a skein. They also have a written tutorial here.
How to use a tufting gun
There are tons of video on Youtube showing how to use a tufting gun. The best way to learn is to watch some videos on Youtube, then practice practice practice!
We also have a written guide here for you guys. This is mobile and printer friendly!
The 4 rules of thumb that really worked for us are as follow:-
Move from bottom to up. If you need to make a horizontal line, you will need to turn your gun horizontally and work in a 90 degree angle. The eyelet on your needle will always be facing away from the stitches you’ve tufted.
Make sure you have multiple strands of yarn fed into your gun. The eyelet on the needle should be about 80% filled with yarn in order to fill the holes created from the needle on your tufting gun. If you’re not using enough yarn, you will see that yarns are coming off from wher you have tufted, and holes are visible on the fabric.
Ensure you press the gun firmly against the primary tufting fabric while you tuft
Last but not least, make sure your fabric is drum tight!
Here’s a great video by AJ Makes from Magic Carpet on how to use a tufting gun. She does really cute rug, do check out her work on Instagram.
Finishing
After you’ve completed the tufting part, you will need to apply binders/glue to the back of the rug to ensure the yarns stay in place.
Before we move on, let’s make sure we are clear on a few important terms. Primary backing is the material in which the carpet fiber is tufted. Secondary backing (usually look like mesh/net or commonly known as action bac) is any material laminated with latex to the primary backing for dimensional stability while locking individual tufts in place. Last but not least, final backing is a layer of thick fabric used to cover up primary & secondary backing giving the rug a polished finishing – this is optional.
There are a few types of finishing commonly used by tufters. Now let’s talk about glue and these finishing next.
Binders/Glue
The best binder to use for tufted rug are those manufactured for its exact purpose.
Most tufted rug manufacturers are using latex binder with action bac to hold yarns in place. There are many types of binders and the kind that are most commonly used in Asia is latex with fillers. These binders provide great tuft bind and structural stability while maintaining softness and flexibility for the rug without cracking.
For the edging, high solid content vinyl binder works best. It holds the edging tape to the rug firmly while staying very flexible. The high solid content in the binder also means that the glue will not seep through the tape and leave visible stain on the front of the tape.
If you do not have access to these industrial grade binders for carpet, below are a few good options you can find online
Henry 663 Outdoor Carpet Adhesive (available in Malaysia)
AAT 1132
Roberts 3095
Also, if you are making tufted mirror or small wall hanging, PVA glue is acceptable. It is not advisable to use PVA for carpet or rug because it dries hard and tends to crack over time
Types of Finishing
There are many ways to finish a rug. The most common finishing fabric used by leisure/home tufters is felt or anti-slip felt backing. They’re easy to cut into any shape and sizes. The fabric also does not fray hence require no hemming. Spray adhesive or any carpet glue is suitable for this application
For professional finishing, you will need to have the right glue/binder, fabric or tools to do this. Here are a few ways to finish off your rug professionally, assuming you are already using the correct binder to glue the yarn in place.
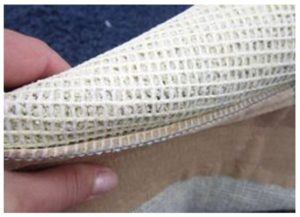
Finish off with only latex binder and secondary backing. Edges are folded in and secure with egding glue. Binding tape is optional. This is how the back of the rug would look like
Image from realcleanrugs.com
Image from claimsjournal.com
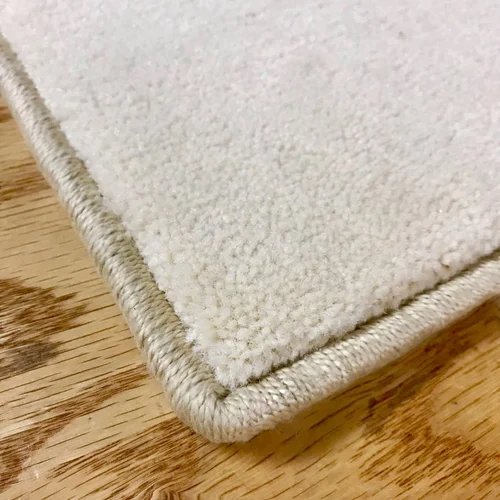
2. Use final backing to cover up the back of your carpet and bind the edges with rug binding tape.
Image from plushrugs.com
3. Use professional carpet serging/binding service provided by rug company with backing mentioned in No. 1 or No. 2.
Image from arearugfactory.com
Tufting Gun Maintenance
To maintain your tufting gun, brush off lints with a brush and oil the moving parts with sewing machine oil after every use. It doesn’t hurt to oil too often 🙂
Most non-pneumatic tufting gun has a plastic cogwheel outside the body of the gun, it’s best to store your gun on a soft surface to avoid deforming the cogwheel.